
Webpack 基础
为什么需要Webpack
在没有使用webpack时我们怎么写JavaScript的?
const button = document.createElement('button');
button.innerText = 'Submit!';

document.body.appendChild(button);
<!DOCTYPE html>
<html lang="en">
<head>
  <meta charset="UTF-8">
  <meta name="viewport" content="width=device-width, initial-scale=1.0">
  <meta http-equiv="X-UA-Compatible" content="ie=edge">
  <title>Document</title>
</head>
<body>

  <script src="index.js" ></script>
</body>
</html>
或者 直接写到script标签中
<!DOCTYPE html>
<html lang="en">
<head>
  <meta charset="UTF-8">
  <meta name="viewport" content="width=device-width, initial-scale=1.0">
  <meta http-equiv="X-UA-Compatible" content="ie=edge">
  <title>Document</title>
</head>
<body>

  <script>
    const button = document.createElement('button');
    button.innerText = 'Submit!';

    document.body.appendChild(button);
  </script>
</body>
</html>
这样有什么问题呢?
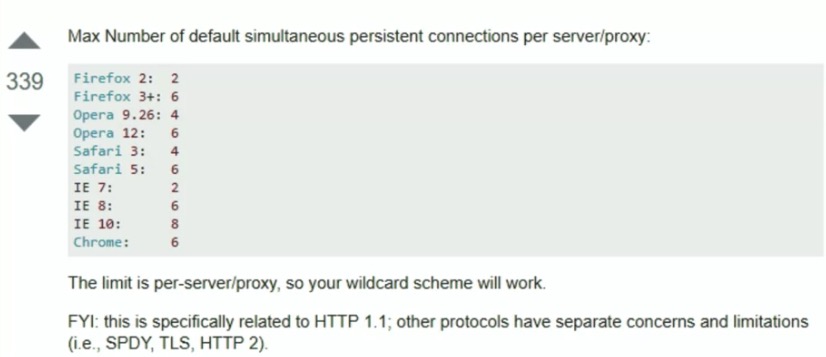
- 连接数量过多: 当一个页面有太多script需要加载时,会产生过多的http请求,影响用户体验,每个浏览器都对并发的http连接有限制:
- 无法管理:当一个页面有很多script标签,并且相互间有依赖时,管理scripts标签管理简直就是噩梦。
- 对全局作用域的污染
JavaScript 模块 (Modules)
CommonJS (modules 1.0)
Node.js 中使用CommonJS 作为模块规范
// index.js
const path = require('path');
const { add } = require('./add);

// add.js

exports.add = (first, second) => first + second;
CommonJS的问题
- 浏览器不支持
- 慢 同步加载
CommonJS的问题解决方案
- Browserify -> Static
- requireJS -> Loader
- systemJS -> Loader
Ecma Module
如何使用Webpack?
- 使用config文件
webpack.config.js
 module.exports = {
  entry: {
    vendor: './src/vendors.ts',
    main: './src/main.browser.ts'
  },
  output: {
  	path: 'dist/',
  	filename: '[name].bundle.js'
  }
}
- 使用Webpack CLI
> webpack <entry.js> <result.js> --colors --progress
> webpack-dev-server --port=9000
- 使用Node API
 var webpack = require("webpack");
 // returns a Compiler instance
 webpack({
    // configuration object here!
 }, function(err, stats) {
   // …
   // compilerCallback
   console.error(err);
 });
开始使用Webpack
npm run build到底是什么? npm scripts
之前面试很多初级前端工程师时,总会去问一下这样的问题,他们大都已经有2年左右的开发经验,却很少有能回答出这样简单的问题的。
在安装完webpack后,在shell中输入webpack回车会提示找不到命令(也不在环境变量PATH中),npm包在安装好后会把可执行文件在node_modules/bin目录下,尝试执行./node_modules/.bin/webpack就会成功执行了。 较之前打包的文件多出了很多处理异步加载的代码
这样有点太麻烦了,多数情况下,开发则会在package.json中有这样几行:
{
  "name": "awesome-package",
  // ...
  "scripts": {
    "build": "webpack --mode production"
  },
  // ...
}
其中build为npm script名称,后面的webpack是一段bash脚本。
scripts相当于先将./node_modules/.bin/追加到PATH环境变量中后执行的bash。
调试webpack
可以在package.json的scripts节点中添加
"debug:webpack": "node --inspect --inspect-brk ./node_modules/webpack/bin/webpack.js"
其中 –inspect-brk是在程序第一行时设置break point
这样打开Chrome就可以对webpack进行单步调试了。
第一个模块
新建文件./src/index.js和./src/user.js;
// ./src/user.js
const user = 'This is User';
export default user;
// 向外导出user常量
// ./src/index.js
import user from './user';
console.log(user);
// 引入user模块,并输出到控制台
使用webpack进行打包。
> npm run webpack

webpack --mode production
Hash: d089f9362f36dd8dabf0
Version: webpack 4.8.0
Time: 83ms
Built at: 02/09/2019 1:14:37 PM
  Asset       Size  Chunks             Chunk Names
main.js  586 bytes       0  [emitted]  main
Entrypoint main = main.js
[0] ./src/index.js + 1 modules 81 bytes {0} [built]
    | ./src/index.js 46 bytes [built]
    | ./src/user.js 35 bytes [built]
打包后的文件在./dist/main.js
> node ./dist/main.js
=> This is User
核心知识
Entry
//webpack.config.js
module.exports = {
  entry: './src/index.ts',
  //...
}
Output
//webpack.config.js
module.exports = {
  //...
  output: {
    path: ‘./dist’,
    filename: ‘./bundle.js’,
  },
  //...
}
Rules and Loader
//webpack.config.js
module.exports = {
  //...
   module: {
     rules: [
     	{test: /\.ts$/, use: 'ts-loader'},
     	{test: /\.js$/, use: 'babel-loader'},
     	{test: /\.css$/, use: 'css-loader'}
     ],
   }
  //...
}
module: {
  rules: [
    {
      test: regex,
      use: (Array|String|Function)
      include: RegExp[],
      exclude: RegExp[],
      issuer: (RegExp|String)[],
      enforce: “pre”|”post”
    },
  ],
}
test: 一个正则表达式,什么样的文件会需要运行loader。use: 一个数组、字符串或者方法,返回一个loader对象。envforce: 字符串pre或者post,这个规则的时机是在其他规则前或者之后。include: 一个正则表达式的数组,哪些路径或文件是包含在搜索范围内的。exclude: 一个正则表达式的数组,哪些路径或文件是被排除的。isuser: 一个正则表达式或字符串的数组,这个选项是限制依赖来源的。比如值为src/index.js,表明只在模块是被src/index.js文件依赖的才会运行这个的rule。
串联loader
rules: [
  {
    test: /\.less$/,
    use:[’style’,’css’,’less’]
  }
]
loader可以串联,以上loader数组会从右往左依次执行,相当于style(css(less(source)))。
style.less => [less-loader] => style.css => [css-loader] => *.js => [style-loader] => inlineStyleinBrowser.js
其中webpack内置”json-loader” 所以son可以直接引用不用安装其他loader。
loader也可以传入参数
{
  test: /\.jpe?g$/,
  use: [
    {
      loader: 'url-loader',
      options: {
        limit: 3200
      }
    }
  ]
}
Webpack Plugin
- plugin是一个含有
apply属性的对象 - plugin允许在整个编译生命周期内插入需要的hook
- webpack本身自带了很多plugin
以下为一个Webpack Plugin的样子
function BellOnBundlerErrorPlugin () { }

BellOnBundlerErrorPlugin.prototype.apply = function(compiler) {
  if (typeof(process) !== 'undefined') {

    // Compiler events that are emitted and handled
    compiler.plugin('done', function(stats) {
      if (stats.hasErrors()) {
        process.stderr.write('\x07');
      }
    });

    compiler.plugin('failed', function(err) {
      process.stderr.write('\x07');
    });

  }
}

module.exports = BellOnBundlerErrorPlugin;
使用plugin
需要使用plugin的实例,所以都需要实例化。
// require() from node_modules or webpack or local file
var BellOnBundlerErrorPlugin = require(‘bell-on-error’);
var webpack = require(‘webpack’);

module.exports = {
  //...
  plugins: [
	new BellOnBundlerErrorPlugin(),

	// Just a few of the built in plugins
	new webpack.optimize.CommonsChunkPlugin(‘vendors’),
	new webpack.optimize.UglifyJsPlugin()
  ]
  //...
}
webpack自身的实现有80%都是使用plugin的方式。
根据环境分隔Webapck config文件的方式
// ./webpack.config.js
const webpackMerge = require('webpack-merge')

// 公用配置
const baseConfig = {
  entry: {
    main: './src/index.js'
  },
  output: {
    filename: 'bundle.js'
  },
  module: {
    // ...
  }
}

module.exports = ({
  mode,
  presets
} = {
  mode: 'production',  // 默认为production
  presets: []
}) => {
  return webpackMerge(
    baseConfig,
    modeConfig(mode),
    presetConfig({
      mode,
      presets
    })
  )
}
开发环境的webpack配置。
// ./build/webpack.development.js
module.exports = () => ({
  devServer: {
    // ...
  }
});
线上环境的webpack配置。
// ./build/webpack.production.js
module.exports = () => ({
  // ...
});
加载PreSets的方法
// ./build/loadPresets.js
const webpackMerge = require('webpack-merge')

const applyPresets = (
  env = {
    presets: []
  }
) => {
  const presets = env.presets || []
  const mergedPresets = [].concat(...[presets])
  const mergedConfigs = mergedPresets.map(presetName => require(`./presets/webpack.${presetName}`)(env))

  return webpackMerge({}, ...mergedConfigs)
}

module.exports = applyPresets
// ./build/presets/webpack.analyze.js
const WebpackBundleAnalyzer = require("webpack-bundle-analyzer").BundleAnalyzerPlugin;

module.exports = () => ({
  plugins: [new WebpackBundleAnalyzer()]
});
开发环境运行
webapck --env.mode development
对打包进行分析运行
webapck --env.presets analyze
other tips
- 不要在开发环境使用 hash值进行输出文件,影响缓存。
Webpack 与 Web性能问题
影响页面加载时间的最重要的三个问题
- 首屏加载的JavaScript文件大小
- 首屏加载的CSS文件大小
- 首屏同时发起的http网络请求
性能提升的目标
所以我们定下性能优化的目标:
- 首屏JavaScript <= 200KB
- 首屏CSS <= 100KB
- HTTP请求数 <= 6
- 90%以上的代码利用率(Code Coverage)
其中 Code Coverage 可以使用Chrome的Coverage查看
代码分隔 Code Splitting
使用import()方法
有以下代码,点击按钮后在页面输出文字
// ./src/name.js
export const getName = () => 'Jason Heylon';
// ./src/index.js
import { getName } from './name';

(()=> {
  const fragment = document.createDocumentFragment();

  const button = document.createElement('button');
  button.innerText = "Say Hi";

  button.addEventListener('click', () => {
    const div = document.createElement('div');
    div.innerText = 'Hi ' + getName();
    document.body.appendChild(div);
  });

  fragment.appendChild(button);
  document.body.appendChild(fragment);
})()
实现代码分隔,改变button添加click listener的实现:
const getName = () => import('./name');

// ...
button.addEventListener('click', () => {
  getName().then(nameModule => {
    const div = document.createElement('div');
    div.innerText = 'Hi ' + nameModule.getName();
    document.body.appendChild(div);
  })
});
其中import()方法会返回一个promise
再次使用webpack build 会多出0.bundle.js
Version: webpack 4.8.0
Time: 1265ms
Built at: 03/04/2020 5:35:03 PM
      Asset       Size  Chunks             Chunk Names
  bundle.js    370 KiB    main  [emitted]  main
0.bundle.js  561 bytes       0  [emitted]
 index.html  182 bytes          [emitted]
在页面中点击按钮后可以看到0.bundle.js的请求,说明我们的代码拆分生效了。并且在第二次点击按钮时也不会再次加载0.bundle.js,因为第一次加载0号模块时webpack会对其进行缓存。

如果打开打包好的文件可以看到./dist/bundle.js 较之前打包的文件多出了很多处理异步加载的代码
__webpack_require__: 是加载模块的主要方法__webpack_require__.e: 方法用于在head中创建script标签,require.ensurewebpackJsonpCallback: 方法用于处理异步加载模块后的回调方法
整段代码就是一个IFFE(立即执行函数),函数的参数就是代码中import的模块,其中参数的第一个模块就是entry所指的文件了。
动态的代码分隔
比如:我们需要动态的导入当前主题的模块,模块放在./src/themes/xx.js这样的目录结构下。
const getTheme = (themeName) => import(`./src/themes/${themeName}`);

if (window.isDarkMode) {
  getTheme('dark').then(module => module.applyTheme());
} else {
  getTheme('light').then(module => module.applyTheme());
}
使用动态代码分隔是需要一些条件的import方法的参数要是一个目录表达式,像import(someVar)就无法使用了,webapck会提示一个错误。
注:虽然是动态代码分隔,但也只是在webpack打包阶段,打包完生成的都是静态代码。
魔法备注
更多可查看文档
webpackChunkName: 在使用代码拆分时,我们是可以为每个被拆分的模块chunk命名webpackPrefetch: 使用link加载chunk添加prefetch属性 Link prefetchingwebpackPreload: 使用link加载chunk添加preload属性 rel preload
Webpack Plugin
Webpack插件系统非常强大,他的底层是一个叫做Tapable的模块, 可以查看webpack的源码 在./lib/Compiler.js中
// ...
class Compiler extends Tapable {
	constructor(context) {
		super();
		this.hooks = {
			/** @type {SyncBailHook<Compilation>} */
			shouldEmit: new SyncBailHook(["compilation"]),
			/** @type {AsyncSeriesHook<Stats>} */
			done: new AsyncSeriesHook(["stats"]),
			/** @type {AsyncSeriesHook<>} */
			additionalPass: new AsyncSeriesHook([]),
			/** @type {AsyncSeriesHook<Compiler>} */
			beforeRun: new AsyncSeriesHook(["compiler"]),
			/** @type {AsyncSeriesHook<Compiler>} */
			run: new AsyncSeriesHook(["compiler"]),
			/** @type {AsyncSeriesHook<Compilation>} */
			emit: new AsyncSeriesHook(["compilation"]),
			/** @type {AsyncSeriesHook<Compilation>} */
			afterEmit: new AsyncSeriesHook(["compilation"]),
// ...
在构造函数中为this.hooks定义了一系列的钩子,其中SyncHook, SyncBailHook,AsyncParallelHook,AsyncSeriesHook都是由Tapable模块提供的
插件的样子
class HelloWorldPlugin {
  apply(compiler) {
    compiler.hooks.done.tap('Hello World Plugin', (
      stats
    ) => {
      console.log('Hello World!');
    });
  }
}

module.exports = HelloWorldPlugin;
插件就是一个包含apply方法的类,接受一个参数compiler,它就是当前运行的Compiler(Tapable)的实例,更多例子可以看看webpack自带的插件,比如EntryOptionPlugin
Tapable
Tapable是webpack团队独立出来的插件模块,使用者可以非常简单的实现插件管理。 举一个例子:
// 定义Person类,包含work,eat,sleep三个实例方法
// 我们想在每个实例方法前插入hook
class Person {
  constructor (name) {
    this.name = name;
  }

  work() {
    // beforeWork hook
    console.log(`${this.name} work`);
  }

  eat(food) {
    // beforeEat hook
    console.log(`${this.name} eat ${food}`);
  }

  sleep() {
    // beforeSleep hook
    console.log(`${this.name} sleep`);
  }
}
我们引入Tapable, 在构造函数中添加hooks, 在eat前加入插件,这样在每次eat方法内会调用这个插件。
const {
  Tapable,
  SyncHook
} = require("tapable");

class Person extends Tapable {
  constructor (name) {
    super();
    this.name = name;

    this.hooks = {
      beforeWork: new SyncHook(),
      beforeEat: new SyncHook(["food"]),
      beforeSleep: new SyncHook()
    };
  }

  work() {
    this.hooks.beforeWork.call();
    console.log(`${this.name} work`);
  }

  eat(food) {
    this.hooks.beforeEat.call(food);
    console.log(`${this.name} eat ${food}`);
  }

  sleep() {
    this.hooks.beforeSleep.call();
    console.log(`${this.name} sleep`);
  }
}

const p = new Person('Heylon');
p.hooks.beforeEat.tap('WashHandsPlugin', food => console.log(`Wash hands before eatting ${food}`))
p.eat('pasta');
// => Wash hands before eatting pasta
// => Heylon eat Pasta
一些Webpack的概念
Compiler
Compiler是主要运行的模块,它使用CLI或者Node API传入的webapck配置参数来创建Compliation实例。继承于Tapable, 可以被组件注入hook。
Compliation
Compliation实例 创建于Complier,可以通过它访问项目中的所有模块以及他们的依赖。也继承于Tapable, 可以被插件注入hook。
Resolver
Resolver是在文件系统中定位和确定指定的文件是否存在。webpack优化了node自带的Resolver: enhanced-resolve
Module Factories 模块工厂
webpack中目前包含两个 Module Factory
Module Factory的作用是将导入的源文件,生成一个模块对象(包含源代码,文件名等原信息)。
Parser
编译器将源文件转化为AST. Webpack默认使用Acorn。 Babel使用的babylon后来迁移到了@babel/parser
Parser在把源文件转换为AST后,对其分析,找到所有的require、import 并创建依赖关系对象。
Templates
包含render方法,通过对输入的模块进行数据绑定(data binding),来生产打包后的代码。
Webpack 打包步骤
- 构建模块依赖图。
- 对模块依赖图进行优化。
- 将模块依赖图渲染为打包后的代码
写一个Webpack插件
写一个Webpack Loader
Webapck打包优化
使用speed-measure-webpack-plugin检测
resover优化
- 必要的alias
- loader必要的include和exclude
缓存相关
- cache-loader
- dllplugin
- HardSourceWebpackPlugin
thread-loader并发
其他
resolve.extensions中只添加必要的少量后缀名,- 开发环境下不使用
ExtractTextPlugin、image-loader等不必要的loader和plugin。 - babel-loader开启cache
Til next time,
Jason Heylon
at 00:00
